

You Will Need:
Fabric 110 cm wide
EU 32-40/UK 4-12/US 0-8 1.3 m
EU 42-54/UK 14-26/US 10-22 2 m
Fabric 140 cm wide
EU 32-40/UK 4-12/US 0-8 1 m
EU 42-48/UK 14-20/US 10-16 1.3 m
EU 50-54/UK 22-26/US 18-22 1.9 m
Thread
5 buttons (diameter of 2 cm)
30 cm interfacing
No. 8 Svaneke - Version 1
Shirt with a peplum. The collar has a rounded shape. The front placket has five buttons. The shirt has bust darts, pleat in the waistline on both front and back.
Fabric choice:
Light to medium weight woven fabric. Cotton, Silk, Wool, Viscose, Cupro, Linen or Polyester The final look of the garment will depend on the type of fabric you choose. Not suitable for jersey.
Find Your Size:
Take your measurement according to the measurement chart. Choose the size closest to your measurement. Print measurement chart here

Fitting:
We recommend that you always make a muslin before you cut the fashion fabric, to make sure your finished style will fit you perfectly. Find the fitting guide right here.
Cutting Fabric
On each pattern piece you will find a capital letter. On the cutting layout plan, you will find the same capital letters so that you can easily see which pattern pieces to use for the view you have chosen.

YOU WILL NEED THE FOLLOWING PATTERN PIECES:
A,B,C,D,G,H


Sewing
NB! THE PATTERN HAS 1 CM SEAM ALLOWANCES INCLUDED, UNLESS OTHERWISE NOTED.
NOTE! You Can Finish All Side, Shoulder And Sleeve Seams With A French Seam, If You Like A Better Finish On The Inside.
1. Cut all your pieces in fabric and interfacing
2. Press the interfacing to the collar (D) and the front edge (H)

Sew The Bodice
3. Sew the darts on the front piece (C) and the back piece (B). All waist darts must be sewn as a square. See the drawing below.
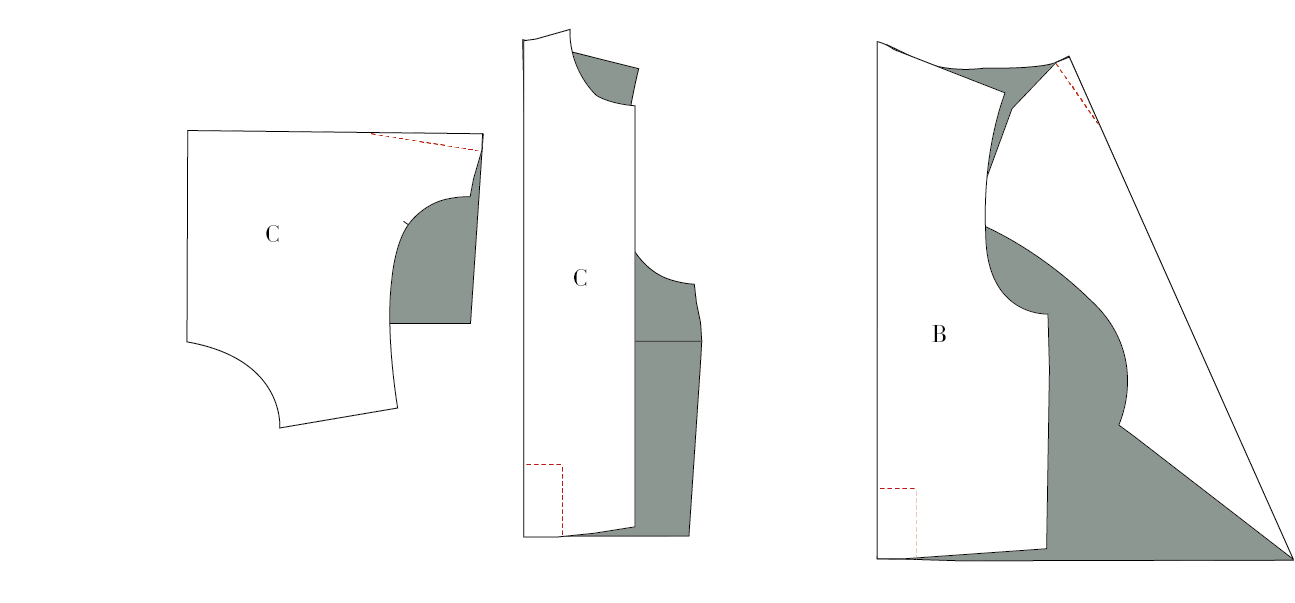
4. Press all darts towards CF and CB.
5. Finish the seams of:
You can finish by overclocking, making a zig-zag or with bias tape.
Shoulder seams
Side seams
Sleeve seams.(A)
Side seams of peplum (K) (G)

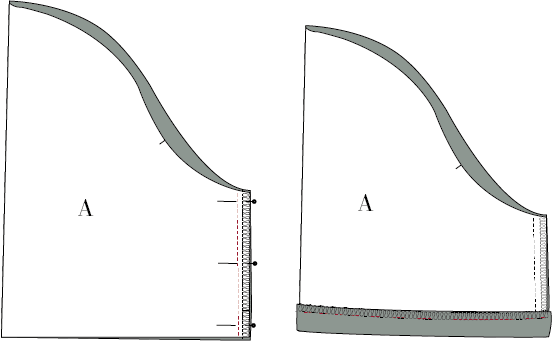
6. Sew the sleeve(A) seam, right sides together. Press the seam allowances open.
7. Hem the Sleeves with a fold of 2 cm. You can make a topstitch or hem by hand with a catch stitch.
8. Sew the shoulder seams, right sides together. Press the seam allowances open.
9. Sew the side seams, right sides together. Press the seam allowances open.

10. Sew the collar, right sides together. Lip notches in the seam allowance. Turn and press.

Sew The Peplum
11. Sew the side seams, right sides together. Press seam open.
12. Hem the peplum with a narrow hem. Fold 0.5 cm then 0.5 cm

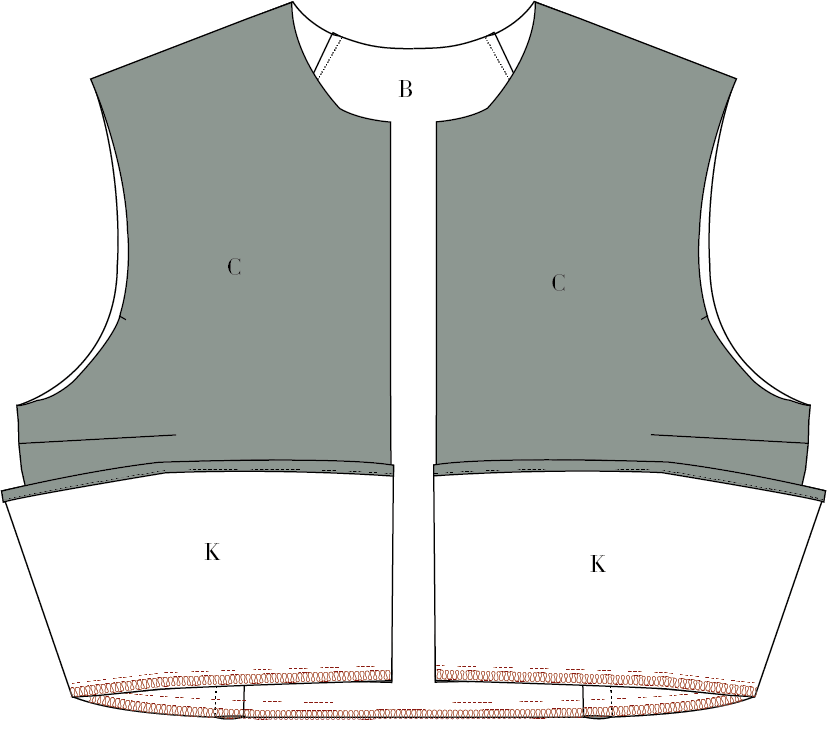
13. Sew the peplum to the bodice, right sides together.
14. Finish the waist seam allowance by overlocking or with bias tape. Press the seam allowances down.
Sew The Blouse
15. Sew the placket to the front pieces: Place right side of the placket on the wrong side of the blouse. The bottom of the placket must extend 1 cm past the hem in both top and buttom. Stitch the placket in place.
16. Fold the front edge in half, right sides together. Sew to the notch at the neckline. Cut to the stitching line.
17. Sew the bottom of the placket, right sides together.

18. Turn the placket and fold in the seam allowance inside the placket.
19. Sew the placket in place along the folded edge with a topstitch 0.2 cm from the edge.

20. Sew the undercollar to the neckline of the shirt, right sides together. The collar ends at the centre of the placket. Press the seam allowance into the collar, and fold the collar around the neck.
21. Press and pin the collar in place.
22. Stitch the collar to the shirt with a top stitch 0,2 cm from the edge.

23. Sew a gathering stitch 0.5 cm and 1.5 cm around the sleeve head.
24. Attach the sleeve to the armscye matching notches at the shoulder seam and front piece (C). See guide
25. Set in the sleeves. Note that the sleeves have a front and back and that the sleeve cap has ease.
26. Finish the seam allowance of the armscye and press the seam into the sleeve.

27. Make button holes at the right front, follow the guideline on the pattern.
28. Sew in the buttons .